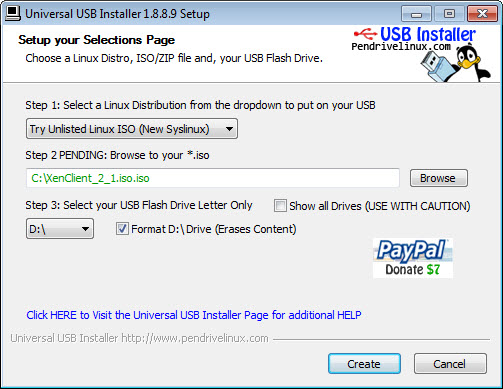
Today I finally received a new laptop (HP Elitebook 8760W) which is on the Citrix XenClient HCL. Due to a ‘small’ primary SSD disk (160GB) I exchanged the cd-rom device for a additional harddisk, to store additional virtual machines. Without the cd-rom drive I had to install Citrix XenClient 2.1 with a bootable USB Key. Creating a bootable USB Key was pretty straight forward:
- Download Universal USB Installer
- Download Citrix XenClient 2.1 ISO
- Start Universal USB Installer
- Step 1: Try Unlisted Linux ISO (New Syslinux)
- Step 2: Select the XenClient ISO
- Step 3: Select your USB Key
- Step 4: Select Format Drive
- Step 5: Hit Create !
The next step in installing XenClient is to ensure that your computer has the correct BIOS settings. As a general rule, please ensure that:
- SATA is set up to use AHCI mode.
- Intel (R) Virtualization Technology is enabled.
- The Intel (R) VT-d and VT-x features are enabled.
- Trusted Execution Technology (TXT) and the Trusted Platform Module (TPM) are disabled (TXT and TPM support is available in the XenClient XT product).
To Prepare an HP Device for Installation:
- Press Esc and then F10 while the machine is booting to enter BIOS setup.
- Set System > System Configuration > Virtualization Technology > Enabled.
- Set System > System Configuration > SATA Device Mode > AHCI.
- Set System > System Configuration > TXT Technology > Disabled.
- Press the WiFi icon so it changes color from red to blue.


